Studying the photo you can see that the woven part has been removed from the front beam since it got so wide. I have it wrapped around an empty Christmas paper tube between a couple of rulers to keep it straight. When I am weaving, I put a metal pole in the tube to get a nice tension. Seems to work quite well.
Thursday, October 16, 2008
Tapestry Spiral - 2 more yards done
Studying the photo you can see that the woven part has been removed from the front beam since it got so wide. I have it wrapped around an empty Christmas paper tube between a couple of rulers to keep it straight. When I am weaving, I put a metal pole in the tube to get a nice tension. Seems to work quite well.
Friday, October 10, 2008
The Story of the Hat
I created a hat. It is a 'Little Joe' cowboy hat covered in a mosaic of egg shells with a Mondrian inspired hat band.

These were the inspiration for the colors of my Mondrian Over Easy hat that I recently finished and will unveil to the group on Saturday. These are flowers from a garden down the street - we walk the dogs by these flowers almost everyday. They match nicely with the conference colors.The band was straight when I wove it but during wet finishing I nudged it into a curve so the band would fit better on the hat.
Using egg shells as a surface design takes a bit of finesse, patience and steady hands. But the result is well worth the effort.
I love the hat. Can't wait for the Exhibit to be over so I can wear it.
If you are in Southern California on Sunday November 2 stop by and check it out in person at the Weaving & Fiber Festival taking place in the Torrance Cultural Center from 10pm to 4pm.
Mondrian Over Easy
The Conversation Piet: I construct lines and color combinations on a flat surface, in order to express general beauty with the utmost awareness.
Nicki: I use egg shells to make my lines emerge and metallic thread to make my colors pop but since the earth is round I prefer my curves to your flat surfaces.
Piet: Oh, curves are so emotional.
Nicki: But emotion ignites inspiration.
Piet: Nature inspires me… but I want to come as close as possible to the truth and abstract everything from that, until I reach the foundation of things.
Nicki: I understand. But does that not beg the question- which came first, the chicken or the egg?
Piet: Intellect confuses intuition.
Wednesday, October 01, 2008
My Color Wheel
The results of yesterday's dye day.The colors came out great...a lovely set of saturated colors all in my tapestry yarn of choice.
I've taken a number of dye classes but I think using your own yarn, the yarn you use day in day out, is the way to go.
Tuesday, September 30, 2008
Tapestry Spiral - progress
Here's a photo with about 5 yards completed - not quite half done. My goal is to weave two sections a day. It only takes about 20 minutes to do that and doesn't require much thought.
I wrote about yarn selection back in August. Here you can see the red sections are starting to become more prevalent and soon the green will recede more.
As you can see my front beam is almost full so I will have to remove the woven material from the front beam and have it hang down the front while I weave the rest. This was not unexpected and I have a plan on how I will make it work.
The real interesting question is whether there is enough warp to complete the entire design...
Wednesday, September 17, 2008
Weaving & Dogs
After several hours, we got nowhere. It turned out we kept going over the same spot over and over again. The wind was so strong that no matter how wide we tacked the wind would take us back to where we started. A bit of ground hog day on the water. In order to get to Anegada before night we changed our approach - turned on the autopilot along with the engine and motor sailed all the way.
Anegada - a fabulous spot...away from everywhere...if you ever have the chance to stop by - do it.
Anyway, yesterday I got to the half way point on my Mondrian inspired hat band. This morning I wove an inch or two and then decided I had to rip. I just couldn't stand a small imperfection about four inches down. It looked like I snagged one or two warp ends...remember that the warp is thread so it was a tiny, a very tiny imperfection. But boy with every pass of my shuttle the bigger and more noticeable it became.The thing about imperfections in weaving is that once I notice them they continue to nag at me as I weave. The further I get from the imperfection the more it bothers me and the worse it looks. I know deep down I should just stop and rip & fix when I first notice it...but I often end up thinking - oh it won't show or I can fix it later. This time I had to rip out about 80 passes. Then I had the toughest time fixing it. I re-wove the same row about five times before I was happy. I figured if I was fixing it - I should at least be completely satisfied. I finally said...enough. Time to do something different - time to weave some bricks. Hopefully, tomorrow morning I should be able to catch up and be half way done on the hatband... again.
I have now five rows of bricks with many more to come. The colors are starting to brighten as I move out of the browns and into the reds. Each brick has a different design. I get to weave whatever I feel like weaving - no structure. Only rule is that 'no brick is alike'. I finally broke down and created a color selection plan so I don't have to struggle with color selection.
I now find weaving my brick wall to be quite relaxing and fun. Similar to playing with the dogs.
Friday, September 12, 2008
Thursday, September 11, 2008
Selecting a Balanced Palette
Well, it's all planned out and in the execution stage. My goal is to complete it by the end of September.
I originally had selected three saturated colors; a vibrant red-orange, a vibrant yellow-orange and a teal. I have since tossed the teal and replaced it with a magenta or fuchsia color - a red purple. While walking the dogs I had seen a grouping of flowers in those three analogous colors and they looked excellent together. So now they will become part of my headband.
Here's a photo of my final colors in Sulky sewing thread.
I designed an initial cartoon as a starting point by simply putting boxes and colors where they seemed 'right' in a self made Mondrian design. I wrote about that here. Later I studied the design and decided I needed to have a better balance of the colors - no one color should stand out and I wanted it to be a bit easier to weave.
To make it easier to weave I decided to have squares the width of the band, one in each color located equally around the band. I would then put the smaller rectangles and squares along with the greater complexity between the squares.
Here is the final design in close to the size it will be once woven. The colors aren't true in the cartoon nor in the photo. It was created in excel. When I am ready to weave I will print it out larger so I can actually read each row and column since they indicate which shafts should be raised for each shuttle of colored thread. [You may notice the proportions don't look quite right...yes...I was a bit lazy. Those squares in the cartoon would have been a bit more square if I had worked on getting the rows and columns in excel to be the same size...]
Anyway, it took a while to get to this point since I took a couple of iterations to get a good balance between the three analogous colors. Mondrian tended to use a lot of white with a few other colors always separated by black. The other colors were always proportionally balanced. I figured if I was trying to converse with Mondrian, this part of the conversation should be balanced.
My first step was to figure out how much of each color I had in the design. Since I did it in excel, it was pretty easy to get. I discovered the red/orange occupied the greatest proportion of the design with the red/purple and yellow/orange having smaller and similar proportions. Whether that is a good balance depends on how visually intense each of the colors are. If they are equally intense then they should be in equal proportions and I would need to alter my design.
I used concept of balance in the Munsell Color Theory Handbook that I have been studying. It says to achieve balance you need a good balance of both chroma and value. For example, if you have two colors - one with a stronger chroma and higher value and the other with a weaker chroma and lower value, you would need to use less of the first and more of the second proportionally to achieve balance.
To determine a numerical value for the chroma and value of my three colors, I matched them to the color chips in my Color Handbook. Multiplying chroma by the value gives a representation of the overall impact of the color. I converted those to proportions and discovered that the red-purple will stand out much less than the other two colors and hence would need to occupy a greater proportion of the final piece in order for there to be a good balance.
I was again lucky. I did not have to re-do my design. All I had to do was switch the red-purple with the red/orange and the resulting proportions were in the ballpark for a good balance. A quick switch in excel, the design was done and I was ready to weave.
Now on to sampling... Here is a photo of my sample where I needed to determine how many colors and strands of thread I wanted to weave with in this piece.
I was again lucky. Using two strands of each of the five colors will yield a balanced weave and provide good coverage for the head band. Therefore, I only have to weave one pass for each row in my cartoon. This makes things so much easier.
This afternoon, I actually started weaving the headband and it looks quite astonishing. I love it. Once I have a few more inches done I will take a photo with my better camera to give you a sneak peak at the work in progress.
* You also may be wondering how the bird fits into this creation...trust me...it does...it too is quite astonishing...more later.
Wednesday, September 03, 2008
Weaving a Way
I have woven three tapestries in a series called Deja Vu and come up with two more ideas for pieces in the series. As soon as they are 'framed' I will show some photos.
I have made great progress on my mosaic for our Guild challenge. I still have not yet started the weaving for the hat band...but I reserved September for that part...oh my...it is already September...better start working on that too!
At the next meeting of the Southern California Handweavers Guild I am giving a quick demonstration of the pulled tapestry technique. I decided to show how to make a frame for a picture. It should be an easy piece to pull in front of everyone.
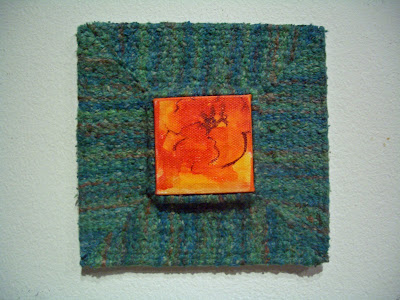
Long ago I bought five small canvases at Blicks...each canvas is 2 inches square. They have been sitting by my desk waiting for inspiration. Well inspiration hit and I am now feverishly making tapestry frames for each one and will then paint something which will go with the frame. The reverse of most people's method.
Here is my first attempt - -
The painting isn't done yet. That is simply magic marker to give me an idea what the a painting would look like in the frame. I will do the final one in acrylics. I think it looks pretty neat. A bit of finishing plus a painting and life will be good.
Sunday, August 24, 2008
Yarn Selection Done
The piece is basically stripes which alternate between two colors of equal value separated by a lighter value. I needed two colors of similar value since I plan to have the two colors alternate and merge from one color to the other. If they were not of similar values then the eye would notice one over the other and it would be difficult for the two colors to effortlessly merge.
As you can see in the photo above, the values worked out well. As did the final colors, shown in the photo below.
Saturday, August 23, 2008
Half a Palette
I then over dyed them with scarlet. I am simply delighted with the results...
Next I need a contrasting color...I am working on a green blue mix.
Tuesday, August 19, 2008
Another Beginning
The Spectrum exhibit is supposed to reflect your latest and best work...
I am pursuing an idea using the pulled tapestry technique I learned about in June while attending Convergence. I already have put thirteen yards of warp on my loom and woven a sample.
Oh my, thirteen yards of warp...it must be huge! Actually when complete it should fit in a bread box. As if anyone still has bread boxes anymore.
Oh my, I am sampling! Sampling is not one of my standard operating procedures. But with 13 yards of warp it pays to donate a foot or two of the warp to verifying the concept which I have never done before will work. The piece IS supposed to be my latest and best work...
Yarn selection is next...
Wednesday, July 23, 2008
Brick Wednesday Update
Today I wanted to try out that 'turn on the valley or mountain' concept. I have heard about it but never really explored it. I generally turn whenever to achieve whatever look I want to get...without any real thought about it. Koehler emphasized that you should be consistent in which you chose in each area for the best looking result.
Koehler explained that if you are weaving an area where one color is increasing and the other decreasing, you can achieve two different looks at the point the two colors change. The look depends upon whether you turn the brown yarn around the warp that is up or around the warp that is down. So I wove a brick and always turned the brown warp on the lower warp to see what would happen.
Yup...there is a difference. As you can see, on the bottom half, where the brown yarn is decreasing, turning on the lower warp yields a more ragged look than on the upper half of the photo where the brown yarn was increasing. Interesting.
So let's see...where two colors meet along a line...one color will be increasing and the other will be decreasing. For a smoother line, have the decreasing one always turn on the upper warps [then, of course, the increasing one will then turn on the lower warps].
Hmmm...I think I will need to really focus on this next time I am weaving a section where the concept applies. Not the easiest thing to remember.
I wonder how the line would look if I alternated each time...
Sunday, July 20, 2008
A Conversation in Fiber
So my challenge is fairly simple in concept. Have a conversation in fiber with O'Keeffe or Mondrian utilizing at least one color from a selection of five That's pretty much it -no further restrictions or limitations. Fiber is basically fiber and a conversation is basically that.
I have selected Mondrian. And have decided to create a hat encompassing a bit of a bird theme. I cannot think of anything less Mondrian than a bird. So now I have a challenge.
Clearly Mondrian's focus on proportion is critical to his pieces. The two concepts backing his most momentous pieces are contrast of proportion and contrast of hue. James Koehler discussed both of these in the color seminar I took at Convergence.
Before I do much study into either concept or the theories underlying Mondrian's pieces, I took a try at creating a Mondrian style design myself.
It looks a bit like Mondrian but just not right. Need to work on the mix of vertical and horizontal shapes as well as the position and quantity of the colors. I do like the three colors I have initially selected to use with the white and black. I need however to be open to using the other two possible colors also. When weaving with taquete the colors tend to blend a bit with the warp color as well as whatever is adjacent.
This will be the band of the hat. It needs to be 26 inches long and will be woven in sewing thread. When considering the proportions I need to remember that the viewer will not see the entire 26 inches at once.
More later...
Wednesday, July 02, 2008
Knitting Sighted
Yes, this is a knitted scarf I finished upon returning from Tampa. It is basically knitted I-cords which were woven into a scarf. Yes, indeed I do remember how to knit and yes, I did knit in public. I knitted it while on the various airplanes or in various airports over the last several weeks.
I must admit I forgot how to cast off so I used safety pins. When I got to the last leg of my trip I had nothing else to do but play around dropping stitches in different ways until I finally remembered how to cast off. Happily, I had all the I-cords completely finished by the time I landed at LAX.
The idea for this scarf came from Knitting New Scarves, 27 distinctly modern designs by Lynne Barr. I like the book since each scarf is really different not due to color nor yarn but due to its shape or structure.
The warp is simply five I-cords knitted in some silk I found in my stash. The weft is also a knitted silk I-cord but knitted with smaller needles. I originally knitted the weft in an off white silk with number 3 needles. When I wove up the weft and warp, it had to be the ugliest thing I have seen in quite awhile. Even my DH thought it was 'not good'.
My roommate at Convergence said she just bought a little gadget at Joann's which made I-cords by turning a little crank. Sounded intriguing so I bought one. I then proceeded to make yards and yards of I-cord from some thinner purple silk I had dyed for a previous project. Once woven with the original warp - I took the picture above.
Far better than the first attempt and better than the one illustrated in the book. I'd really like something a bit thinner so I could wear it more in California. I have a lot of perle cotton in my stash. I may try that next if [when?] the weaving of my two tapestries gets too frustrating.
Ebb Tide Exhibit
Here is a photo of the Ebb Tide Exhibit at Convergence in Tampa. The blue yardage with the two sailboats and START at the top is mine. All the pieces were hung down from a rotunda. There were enough pieces to go all the way around. You could view from above or below. From below they had a list of the pieces, names and artists. All the pieces look spectacular.
On the top level they had the samples along with the descriptions. It was a bit hard to view from the top level since the samples and descriptions were right above where the yardage was hanging. I would touch the sample then kind of hang over the railing to get a good view of the yardage. I would then go around the rotunda to get a better view of a specific piece but would be distracted by another sample to touch.
But hey, it made everyone stay longer and enjoy the pieces more!
Monday, June 30, 2008
Shaped Tapestry
My sample is in the photo. I achieved the curved effect by weaving a straight piece with five triangular spacers on one side. Once I took the piece off the loom, I pulled the warp ends so the negative space from the spacers disappeared making the piece curve. The pink 'nose' and two green eyes were achieved with rectangular spacers.
The weaving is easy. The pulling of the warp is clearly the most fun part of the entire workshop. Susan had slides which she should both her own and the work of her students using this technique.
I have no idea what I would use this technique for, but I am glad I took the workshop. It provides a useful tool for my weaving toolbox.
Wednesday, June 18, 2008
Wedge Weave Bricks
Here is a photo of the bricks from last week and today's Brick Wednesday. This is a nice project since I know I only have to weave one brick on each Wednesday...or I can do more. Last week I didn't feel like weaving. Today I was quite busy packing.These bricks are my first attempts at an intentional wedge weave. You can see the edges bulging out already and the tension is still reasonably tight. I just noticed on the photo that I have some warp peeking out in places...this must have happened after I finished weaving since I can't believe I would have allowed warp to show as I wove. Perhaps, I will need to beat the yarn in harder so it doesn't shift exposing the warp.
Next Wednesday I will try some virtual brick weaving...I'll be travelling and my counterbalance floor loom doesn't travel well.
Monday, June 09, 2008
Now What to Do?
I have sixteen pieces being shown in a variety of exhibits and galleries in Florida around the time of Convergence. Getting everything finished and out the door to the right place by the right time took what seemed like months. I also had to get a CD made for the National Fiber Arts Exhibit in Escondido. That went into the mail today. I also had a special small secret project to finish...and it's done too.
Now what to do...it's not Wednesday so I can't weave a brick. But someone commented that she works with wedge weave on her tapestries and that got me thinking...perhaps I should weave a brick or two in wedge weave. I have never done wedge weave intentionally before so it would be fun to try it.
Early in my weaving life I wanted to weave a perfectly square tapestry...actually three squares inside each other...I was really inspired and 'into' Albers' squares . Since I really didn't like to sew slits I thought it would be a good idea to weave the three squares on a diagonal to avoid the slits. Looked absolutely beautiful on the loom. But once I took it off however, the tapestry came to life, twisted around and ended up in a pyramid shape.
I couldn't believe what happened so I wove the same thing two or three more times...each time weaving it tighter and beating harder. But it always came out the same. It didn't matter, once I took the piece off the loom it went from a 2-D square to a 3-D pyramid.
So weaving an intentional wedge weave brick is on the queue for Wednesday. But what to do now?