Thursday, September 11, 2008

Selecting a Balanced Palette

I have made substantial progress on my Guild challenge. As you may recall, the basic challenge was to have a conversation in fiber with either Mondrian or O'Keeffe. I had selected Mondrian and wanted a hat with a bird theme* ...

Well, it's all planned out and in the execution stage. My goal is to complete it by the end of September.

I originally had selected three saturated colors; a vibrant red-orange, a vibrant yellow-orange and a teal. I have since tossed the teal and replaced it with a magenta or fuchsia color - a red purple. While walking the dogs I had seen a grouping of flowers in those three analogous colors and they looked excellent together. So now they will become part of my headband.


Here's a photo of my final colors in Sulky sewing thread.


I designed an initial cartoon as a starting point by simply putting boxes and colors where they seemed 'right' in a self made Mondrian design. I wrote about that here. Later I studied the design and decided I needed to have a better balance of the colors - no one color should stand out and I wanted it to be a bit easier to weave.

To make it easier to weave I decided to have squares the width of the band, one in each color located equally around the band. I would then put the smaller rectangles and squares along with the greater complexity between the squares.

Here is the final design in close to the size it will be once woven. The colors aren't true in the cartoon nor in the photo. It was created in excel. When I am ready to weave I will print it out larger so I can actually read each row and column since they indicate which shafts should be raised for each shuttle of colored thread. [You may notice the proportions don't look quite right...yes...I was a bit lazy. Those squares in the cartoon would have been a bit more square if I had worked on getting the rows and columns in excel to be the same size...]


Anyway, it took a while to get to this point since I took a couple of iterations to get a good balance between the three analogous colors. Mondrian tended to use a lot of white with a few other colors always separated by black. The other colors were always proportionally balanced. I figured if I was trying to converse with Mondrian, this part of the conversation should be balanced.

My first step was to figure out how much of each color I had in the design. Since I did it in excel, it was pretty easy to get. I discovered the red/orange occupied the greatest proportion of the design with the red/purple and yellow/orange having smaller and similar proportions. Whether that is a good balance depends on how visually intense each of the colors are. If they are equally intense then they should be in equal proportions and I would need to alter my design.

I used concept of balance in the Munsell Color Theory Handbook that I have been studying. It says to achieve balance you need a good balance of both chroma and value. For example, if you have two colors - one with a stronger chroma and higher value and the other with a weaker chroma and lower value, you would need to use less of the first and more of the second proportionally to achieve balance.

To determine a numerical value for the chroma and value of my three colors, I matched them to the color chips in my Color Handbook. Multiplying chroma by the value gives a representation of the overall impact of the color. I converted those to proportions and discovered that the red-purple will stand out much less than the other two colors and hence would need to occupy a greater proportion of the final piece in order for there to be a good balance.

I was again lucky. I did not have to re-do my design. All I had to do was switch the red-purple with the red/orange and the resulting proportions were in the ballpark for a good balance. A quick switch in excel, the design was done and I was ready to weave.

Now on to sampling... Here is a photo of my sample where I needed to determine how many colors and strands of thread I wanted to weave with in this piece.


I was again lucky. Using two strands of each of the five colors will yield a balanced weave and provide good coverage for the head band. Therefore, I only have to weave one pass for each row in my cartoon. This makes things so much easier.

This afternoon, I actually started weaving the headband and it looks quite astonishing. I love it. Once I have a few more inches done I will take a photo with my better camera to give you a sneak peak at the work in progress.


* You also may be wondering how the bird fits into this creation...trust me...it does...it too is quite astonishing...more later.

Wednesday, September 03, 2008

Weaving a Way

I have been weaving up a storm recently with little time to blog. It has been an extremely satisfying month.

I have woven three tapestries in a series called Deja Vu and come up with two more ideas for pieces in the series. As soon as they are 'framed' I will show some photos.

I have made great progress on my mosaic for our Guild challenge. I still have not yet started the weaving for the hat band...but I reserved September for that part...oh my...it is already September...better start working on that too!

At the next meeting of the Southern California Handweavers Guild I am giving a quick demonstration of the pulled tapestry technique. I decided to show how to make a frame for a picture. It should be an easy piece to pull in front of everyone.

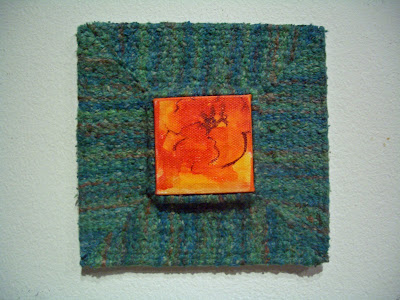
Long ago I bought five small canvases at Blicks...each canvas is 2 inches square. They have been sitting by my desk waiting for inspiration. Well inspiration hit and I am now feverishly making tapestry frames for each one and will then paint something which will go with the frame. The reverse of most people's method.

Here is my first attempt - -


The painting isn't done yet. That is simply magic marker to give me an idea what the a painting would look like in the frame. I will do the final one in acrylics. I think it looks pretty neat. A bit of finishing plus a painting and life will be good.

Sunday, August 24, 2008

Yarn Selection Done

I finished up the yarn dying, selection and preparation for my spiral tapestry.

The piece is basically stripes which alternate between two colors of equal value separated by a lighter value. I needed two colors of similar value since I plan to have the two colors alternate and merge from one color to the other. If they were not of similar values then the eye would notice one over the other and it would be difficult for the two colors to effortlessly merge.

As you can see in the photo above, the values worked out well. As did the final colors, shown in the photo below.


Saturday, August 23, 2008

Half a Palette

I am now satisfied with the red/orange palette that I have created for my spiral tapestry. Here are the yarns that I started out with. They are from my existing stash and are so dull that I doubt I would ever use them again.


I then over dyed them with scarlet. I am simply delighted with the results...


Next I need a contrasting color...I am working on a green blue mix.

Tuesday, August 19, 2008

Another Beginning

I am planning a three dimensional piece for the Spectrum exhibit at Color Connects, a fiber conference focusing on color taking place in Riverside California in early March 2009. I'd like it done by January 15th - the time entry forms are due.

The Spectrum exhibit is supposed to reflect your latest and best work...

I am pursuing an idea using the pulled tapestry technique I learned about in June while attending Convergence. I already have put thirteen yards of warp on my loom and woven a sample.

Oh my, thirteen yards of warp...it must be huge! Actually when complete it should fit in a bread box. As if anyone still has bread boxes anymore.

Oh my, I am sampling! Sampling is not one of my standard operating procedures. But with 13 yards of warp it pays to donate a foot or two of the warp to verifying the concept which I have never done before will work. The piece IS supposed to be my latest and best work...


Yarn selection is next...

Wednesday, July 23, 2008

Brick Wednesday Update

It's Wednesday again and I was able to fit a couple of bricks onto the tapestry wall I am weaving.

Today I wanted to try out that 'turn on the valley or mountain' concept. I have heard about it but never really explored it. I generally turn whenever to achieve whatever look I want to get...without any real thought about it. Koehler emphasized that you should be consistent in which you chose in each area for the best looking result.

Koehler explained that if you are weaving an area where one color is increasing and the other decreasing, you can achieve two different looks at the point the two colors change. The look depends upon whether you turn the brown yarn around the warp that is up or around the warp that is down. So I wove a brick and always turned the brown warp on the lower warp to see what would happen.


Yup...there is a difference. As you can see, on the bottom half, where the brown yarn is decreasing, turning on the lower warp yields a more ragged look than on the upper half of the photo where the brown yarn was increasing. Interesting.

So let's see...where two colors meet along a line...one color will be increasing and the other will be decreasing. For a smoother line, have the decreasing one always turn on the upper warps [then, of course, the increasing one will then turn on the lower warps].

Hmmm...I think I will need to really focus on this next time I am weaving a section where the concept applies. Not the easiest thing to remember.


I wonder how the line would look if I alternated each time...

Sunday, July 20, 2008

A Conversation in Fiber

For our Guild challenge this year, we have been challenged to have a conversation in fiber with either Georgia O'Keeffe or Piet Mondrian utilizing at least one of the conference colors for ColorConnects, a fiber conference spearheaded by the Association of Southern California Handweavers. It takes place in Riverside California in March 2009 and focuses on color.

So my challenge is fairly simple in concept. Have a conversation in fiber with O'Keeffe or Mondrian utilizing at least one color from a selection of five That's pretty much it -no further restrictions or limitations. Fiber is basically fiber and a conversation is basically that.

I have selected Mondrian. And have decided to create a hat encompassing a bit of a bird theme. I cannot think of anything less Mondrian than a bird. So now I have a challenge.

Clearly Mondrian's focus on proportion is critical to his pieces. The two concepts backing his most momentous pieces are contrast of proportion and contrast of hue. James Koehler discussed both of these in the color seminar I took at Convergence.

Before I do much study into either concept or the theories underlying Mondrian's pieces, I took a try at creating a Mondrian style design myself.


It looks a bit like Mondrian but just not right. Need to work on the mix of vertical and horizontal shapes as well as the position and quantity of the colors. I do like the three colors I have initially selected to use with the white and black. I need however to be open to using the other two possible colors also. When weaving with taquete the colors tend to blend a bit with the warp color as well as whatever is adjacent.

This will be the band of the hat. It needs to be 26 inches long and will be woven in sewing thread. When considering the proportions I need to remember that the viewer will not see the entire 26 inches at once.

More later...


Wednesday, July 02, 2008

Knitting Sighted

What? Is that knitting I see?

Yes, this is a knitted scarf I finished upon returning from Tampa. It is basically knitted I-cords which were woven into a scarf. Yes, indeed I do remember how to knit and yes, I did knit in public. I knitted it while on the various airplanes or in various airports over the last several weeks.

I must admit I forgot how to cast off so I used safety pins. When I got to the last leg of my trip I had nothing else to do but play around dropping stitches in different ways until I finally remembered how to cast off. Happily, I had all the I-cords completely finished by the time I landed at LAX.


The idea for this scarf came from Knitting New Scarves, 27 distinctly modern designs by Lynne Barr. I like the book since each scarf is really different not due to color nor yarn but due to its shape or structure.


The warp is simply five I-cords knitted in some silk I found in my stash. The weft is also a knitted silk I-cord but knitted with smaller needles. I originally knitted the weft in an off white silk with number 3 needles. When I wove up the weft and warp, it had to be the ugliest thing I have seen in quite awhile. Even my DH thought it was 'not good'.


My roommate at Convergence said she just bought a little gadget at Joann's which made I-cords by turning a little crank. Sounded intriguing so I bought one. I then proceeded to make yards and yards of I-cord from some thinner purple silk I had dyed for a previous project. Once woven with the original warp - I took the picture above.


Far better than the first attempt and better than the one illustrated in the book. I'd really like something a bit thinner so I could wear it more in California. I have a lot of perle cotton in my stash. I may try that next if [when?] the weaving of my two tapestries gets too frustrating.

Ebb Tide Exhibit

Here is a photo of the Ebb Tide Exhibit at Convergence in Tampa. The blue yardage with the two sailboats and START at the top is mine.

All the pieces were hung down from a rotunda. There were enough pieces to go all the way around. You could view from above or below. From below they had a list of the pieces, names and artists. All the pieces look spectacular.

On the top level they had the samples along with the descriptions. It was a bit hard to view from the top level since the samples and descriptions were right above where the yardage was hanging. I would touch the sample then kind of hang over the railing to get a good view of the yardage. I would then go around the rotunda to get a better view of a specific piece but would be distracted by another sample to touch.

But hey, it made everyone stay longer and enjoy the pieces more!

Monday, June 30, 2008

Shaped Tapestry

I took a one day seminar with Susan Iverson on shaped tapestry in Tampa. It was quite interesting. Something light, amusing and a bit intriguing. Susan had a tapestry at the Leaders Exhibit of a portrait with three shapes coming oddly out of his forehead - she achieved this with a technique she called shaped tapestry.

My sample is in the photo. I achieved the curved effect by weaving a straight piece with five triangular spacers on one side. Once I took the piece off the loom, I pulled the warp ends so the negative space from the spacers disappeared making the piece curve. The pink 'nose' and two green eyes were achieved with rectangular spacers.

The weaving is easy. The pulling of the warp is clearly the most fun part of the entire workshop. Susan had slides which she should both her own and the work of her students using this technique.

I have no idea what I would use this technique for, but I am glad I took the workshop. It provides a useful tool for my weaving toolbox.

Wednesday, June 18, 2008

Wedge Weave Bricks

Here is a photo of the bricks from last week and today's Brick Wednesday. This is a nice project since I know I only have to weave one brick on each Wednesday...or I can do more. Last week I didn't feel like weaving. Today I was quite busy packing.

These bricks are my first attempts at an intentional wedge weave. You can see the edges bulging out already and the tension is still reasonably tight. I just noticed on the photo that I have some warp peeking out in places...this must have happened after I finished weaving since I can't believe I would have allowed warp to show as I wove. Perhaps, I will need to beat the yarn in harder so it doesn't shift exposing the warp.

Next Wednesday I will try some virtual brick weaving...I'll be travelling and my counterbalance floor loom doesn't travel well.

Monday, June 09, 2008

Now What to Do?

I have that post completion let down. You know, that feeling you have when you work super hard to get stuff done for a deadline and then you are abruptly done with what seems like nothing to do. Once complete there is a certain eerie calmness; like floating around in the ocean with nowhere to go.

I have sixteen pieces being shown in a variety of exhibits and galleries in Florida around the time of Convergence. Getting everything finished and out the door to the right place by the right time took what seemed like months. I also had to get a CD made for the National Fiber Arts Exhibit in Escondido. That went into the mail today. I also had a special small secret project to finish...and it's done too.

Now what to do...it's not Wednesday so I can't weave a brick. But someone commented that she works with wedge weave on her tapestries and that got me thinking...perhaps I should weave a brick or two in wedge weave. I have never done wedge weave intentionally before so it would be fun to try it.

Early in my weaving life I wanted to weave a perfectly square tapestry...actually three squares inside each other...I was really inspired and 'into' Albers' squares . Since I really didn't like to sew slits I thought it would be a good idea to weave the three squares on a diagonal to avoid the slits. Looked absolutely beautiful on the loom. But once I took it off however, the tapestry came to life, twisted around and ended up in a pyramid shape.

I couldn't believe what happened so I wove the same thing two or three more times...each time weaving it tighter and beating harder. But it always came out the same. It didn't matter, once I took the piece off the loom it went from a 2-D square to a 3-D pyramid.

In the end I stuffed and sewed them. Here's a photo of them resting next to a carved wooden platypus from Australia. I get a kick out of these pieces every time I see them.

So weaving an intentional wedge weave brick is on the queue for Wednesday. But what to do now?

Saturday, June 07, 2008

A Future Project

Check out the third illustration here...I wonder if that effect can be achieved in tapestry...or fine threads...something to put on the queue.

Thursday, June 05, 2008

Nothing like weaving a brick

The second brick Wednesday came and went and another row of bricks have been layered into my wall. This row is all twill...giving me the opportunity to easily visualize what happens when you use two alternating colors.

I started on the left with a half of brick in a solid twill with pink yarn. The twill goes in reverse to the one immediately below. Half way through weaving this half a brick, I had one of those 'duh' moments...those special moments when you realize the obvious. It's not that I didn't know it, it just never came to the top of my consciousness.

Anyway, what I noticed was the variance in the shadows created by the two twills going in opposite directions. Even though the two bricks where different colors, the shadows on the two bricks were quite different - particular when I moved my lamp around to shine the light on it.

I realized this would be a wonderful way to achieve a different look in my Tapestry Study in Black that I am about ready to weave. The tapestry will be entirely in black yarns and depict Uranus and it 23 moons. Since all the yarns will be black, value will not be an issue nor will hue selection. The key will be to achieve the successful depiction of subject and creation of visual variety & interest entirely through the sheen of different yarns. Now I realize the warp pattern I use will be another tool in my tool box.

Nothing beats weaving a brick.

Tuesday, June 03, 2008

Brick 1 & 4

Tomorrow is Wednesday...Brick Wednesday...the one day of the week when I get to weave on my old counterbalance loom. It has been extremely difficult to not weave on that loom during the week...all I could do is walk by and touch it...and think about what I would like to weave next.

I never got the pictures of the two twills I did. The first is the simple twill in a hand painted mottled yarn. It's feel is fabulous...a nice repetitive bumpiness and texture. I do want to explore using twill more. It will be interesting to see how hatching will look as what I could do with dots. The pattern would be great to provide texture in a tree or landscape.

The second is a zigzag pattern where I changed the direction of the twill each third round trip. Between the mottled blue yarn and the zigzag pattern, it says 'chaos' to me. Looks like it would be wonderful to use in an scene with big waves breaking on the beach or the churning of the water underneath the wave.

Saturday, May 31, 2008

Brick 2 & 3

Oops...I posted this on the wrong blog...I forgot this was an exploratory piece and deserves to be here. ..

to read about Brick 2 and 3 click HERE.

Thursday, May 29, 2008

Brick Wednesday - Week 1

Things are starting to settle down and I am warping up all my looms to start 'creating' vs. 'finishing'. It never occurred to me that getting ready for gallery exhibits would be so time consuming.

I gave a talk at a recent Guild meeting on the topic Is Weaving Genetic. I showed a fair number of photos of my Mothers work as well as mine. My Mother was a textile artist up in the Wine Country of California and she loved tapestry and baskets. One of the photos I showed was of my Mother's old counter balance four harness loom which is now sitting in my studio. The loom hasn't had anything on it for several years and I thought it would be nice to fill the loom with warp and have some fun.

I warped 24 inches at 5 epi [yes...5 epi! Never done anything this wide before] using some fairly thick cotton I had sitting around. I actually don't even know if this stuff will work as warp...we shall see. I actually hand painted the warp with some emerald green, yellow and violet dye. I didn't let the dye sit on the warp too long since I wanted a light value for the warp - just not white.

I will be weaving a brick wall in various tapestry techniques. I intend to explore a number of things with my brick wall. I didn't want white warp since I will be having the cement part of the brick wall be exposed warp and explore how negative space can impact color and structure. Since I am doing a tapestry on a four harness loom I thought I would also explore how various structures [e.g. twill, basket weave, etc.] can be used to enhance a tapestry by adding texture and shadows. I also intend to use up some of my stash...I have lots of leftover dyed yarns from a variety of projects which I would love to use somehow.


I don't want to overly plan this project since I have several other projects which are highly planned. My working title for this tapestry is 'Brick Wednesday'.

My goal will be to weave at leave one brick on every Wednesday until the piece is completed. The brick can be whatever I feel like weaving on that given Wednesday. I, of course, can think & plan on the other days but just no weaving on this piece. There are lots of other looms that need attention.

Here is how I have started...I have four bricks at the bottom. I wanted to see what a twill, basket weave, tabby and zigzag twill would look like when entirely covering the warp as in tapestry. I didn't vary the yarn or do any tapestry techniques so just the structure would stand out. My closeup photos came out blurry so I will try taking photos again with a different camera.

But I must say, these four little bricks definitely have my brain working on overdrive. I really never understood why some tapestry weavers would want a four harness loom. Perhaps I am just beginning to have a glimmer of understanding...

Monday, April 28, 2008

Beginning the Finish...again

I am in the midst of finishing my yardage for the Ebb Tide exhibit in Convergence. I need to send it off in May. You may recall it is a 13 foot maze which you can actually get through if you stare at it long enough and don't get lost. There are clues woven into the maze to help you along if you know your nautical flags, signage and regatta flag indicators. The clues can also distract you along the way.

For fun, I decided to weave a small solution key to go with the yardage. Like the yardage I start at the bottom...or in this case the finish.


I had some extra warp after finishing some beetles and bracelets which I had on queue. You can see the bracelets here and read about the beetles here. The photo shows the beginning of the solution key. I have kept some of the pictorial elements also. The piece is less than 3 inches wide.

Sometimes I think I am nuts...but this time the weaving is quite fun and makes me smile. The colors are cheerful. The weaving focused and intense. Once finished I may make a smaller one and turn it into a bracelet to wear at Convergence. I think it might be cute to have a bracelet with start and finish at each end...

Sunday, April 20, 2008

I Got Your Letter

Dear J -

I received your letter yesterday...

Yes, I have been amiss in not updating my blog. But I do think I have a good reason...five in fact. From the last time we 'chatted' I learned I had been accepted into five exhibits in Tampa in June of this year! Yup - five. Well, so what have I been doing? Lots of weaving, finishing, framing, mailing etc. And I am almost done...3 of the 5 are completely done, 1 is ready for unveiling at my meeting on Wednesday and one is in the finishing stage...hopefully ready for unveiling at my Friday meeting.

Here are the photos of the two that are going into the Complex Weavers exhibit called Weaving in the Computer Age - from inkles to jacquard. Tarpon Springs Cultural Center, Tarpon Springs Florida June 8th-July 30, 2008.

These are done in taquete with rayon and metallic sewing thread. The first is an aristobia beetle...the other two platynophus beetles - - both from Thailand. I wove three of these beetles each with a subtly different palette. These are the two from my personal beetle collection. The actual ones for the exhibit are a bit different so you will have to go to the exhibit in Tarpon Springs to see the versions that are hanging there.

Hope you like them!

I apologize for being incommunicado. I should be freed up in a couple of weeks and will able to chat more often... and actually work on the two pieces that have been swirling around my head for months.

Luv & kisses


N

ps. I will post photos of my other pieces as soon as I can. Some may have to wait until after the exhibits are open...

Wednesday, March 05, 2008

Delicate Dimensions

I am back to weaving with fine threads on my sixteen harness table loom.

I have put on several yards of black polyester serger thread as warp and am happily weaving away.

Here is my first pattern...as you can see I have three pieces being woven simultaneously....with two shuttles moving all the way across the loom and three moving only across their respective warps. The ones making the short trips rest on the c-clamps on each side of the loom. My maze pattern is on an excel spreadsheet on top of the loom.

The colors are reminiscent of a tiger...

Tuesday, March 04, 2008

Bamboo Samples

I bought six cones of bamboo from Webs last year for some reason that has escaped me for many months. I've got a wedding to go to in June so I have decided to weave some material and make some sort of jacket.

Anyway, I have six cones of 10/2 bamboo which is similar to 20/2 silk in size and feel. I've never woven with bamboo so I figured I should do some sampling.

The photo shows two scarves I wove to experiment with sett [24 and 30 epi], the warp values [one is with only dark values, the other with all six colors repeated in the warp] and a variety of undulating twills. They are much brighter in person than the color in the photo.

For the jacket, I figure the 24 epi sett is best. The 30 epi works nicely on a scarf but doesn't seem quite right for a jacket. There are two undulating twills I like and the appearance of the dark values in the warp is my favorite.

As for the jacket, I have a number of options.

I bought this Six Panel Jacket pattern from Nadine Sanders which uses two different handwovens. It might be interesting using two different colors/twills of green for the panels and have a lapel of all six colors and a multitude of twills. I also saw a real easy pattern in Handwoven last year which got me started...ah...now I remember...that is why I bought the bamboo yarn in the first place. Plus, I have two other jacket patterns that I have bought at past Convergences but never used.

Choices, choices, choices...better choose soon since I need to warp and weave!


Thursday, February 21, 2008

His & Her Gourds

DH and I took a gourd class with Don Weeke where we learned how to clean and decorate a dried gourd with weaving, twining, coiling, couching, tenneriffe lace, knottless knitting, wood burning plus paints and leather dyes. Quite a fun and enjoyable workshop...would recommend it to all.

The results say it all: his and her gourds...


Sunday, December 30, 2007

The Starting Line

I got the memory card reader to work so I now have some photos to share.

Here are two of the sailboats in the maze regatta. They are moving along the course nicely, having crossed the starting line without penalty. Below them along the course you can just see the 'keep marker to the port' flag in red.

The Starting Line is at the top of the maze...about twelve feet from the finish line. It is a long a arduous course with a variety of dangers and interesting spots. The sea seems to sparkle in many colors as the sunlight reflects off the water. And the water blends through many shades of blue. In some places, there is a slight reddish color indicating the presence of kelp beds under the water.

The start of the course is marked in a sparkling sea foam green...but it disappears several feet down and it is up to the captains to figure out how to sail the maze and get to the finish line first. The race officials' blue flag hangs at the bottom of the piece to indicate the official finish to the regatta.


Do I Knit?

Wondering if I still knit?

Remember I started a yellow scarf awhile ago? It was the pattern on September 22nd of the knitting calendar. It's done! [This is why I stick to scarves...check the date...it would take me a decade to finish a sweater!]

I really like it. It's a simple yellow cotton scarf with rows of perle. However, I just could not resist unravelling three stitches on each edge to add a fringe. I did make it shorter so as it lengthens it won't be down to my knees. It feels great around the neck...soft and warm.

It is fortunate that the scarf is done [and the maze]...since Santa brought me this real cool knitting book to get me back into the fun nuances of knitting. It has all these interesting shapes to try out

Now I just have to get some yarn....

ps. let's not discuss that one other KWIP...the shadow weave scarf
...I simply hate having projects not completed...

Maze is off the Loom

My Regatta Maze came off the loom yesterday afternoon - all 13 feet worth!

Whew! What a relief. Now all I have to do is weave an eight inch by eight inch sample and I am on my way.

Oh there is some finishing and final tweaking. I put the finishing and tweaking into two categories. The first is the grand tweaking - knotting and snipping the edges and ends that abound as well as removing some of the pressure lines plus a hem on the top and the bottom. These are what must be done so I can get a good photo to send the judges. The second category of tweaks are the detailed ones which could go on for weeks. There are for close up viewing.

The entire piece looks fabulous. The colors are good and the small images do not pop out and distract from the maze. The downside is that it is incredibly difficult to work yourself through the maze since it is so long and the route is circuitous. I am sure a few daring souls will attempt it...but I can see it will be necessary to provide a chart showing the route for all the other viewers who get lost.

...and you say...where is the photo?

...well my camera is on vacation - off sailing in the Windward Islands...but fortunately Santa brought me a new camera guaranteed to take fabulous close ups. I took some photos of the two sail boats at the top of the maze as well as the starting line. Taking pictures was a snap! They look great. Unfortunately, I have not yet figured out how to get the pictures out of the camera onto my computer.

I have tried everything on my computer...now I am off to my DH's computer...then to the memory card reader as last resort.

Monday, December 10, 2007

Getting Closer - 74% Complete

I have 68 more rows to weave in this piece...only 43 more in the maze. The rest is the header consisting of two sailboats and the starting line. Oh yes, and a hem. It is almost starting to become exciting.

Thursday, December 06, 2007

Change in Course

Ah another photo that looks so similar to those in past postings.

Here I am almost 60% complete after making sure I complete at least ten rows per day. At this rate I could be could be done weaving in a couple of weeks. But finishing ten rows a day will become more difficult with the visitors, house guests, Christmas wrapping as well as the more difficult patterns coming up. But hope springs eternal.

This photo depicts a race flag communicating a change in course. It is a flag composed of horizontal blue, white, red, white and blue stripes. The tough part with this color scheme is that the blues and greens recede while the reds pop out. I tried to get the blue to show up more by making it a combination of two metallic blues. It's real hard to tell if it's a good/right color choice since I am viewing it horizontally...I really should stand on a tall chair and look down on it...I had that same problem on weaving tapestry on a horizontal surface - it's the reason I bought an upright tapestry loom.

Tomorrow I hope to cross the 100 row line...meaning I will only have 100 rows to go. The end...[actually the starting line] may be in sight!

PS Looking at the blow up of the photo above I just noticed an odd turquoise line running the middle of the piece...something to check out in the morning....broken thread? odd tension? stucky threads...hmmm.

Monday, December 03, 2007

Man Overboard

It's the December crunch time...the time where I must focus on weaving at least ten rows a day in order to get this piece done in time for photos, slides, samples and mailing.

Today I did nineteen rows...quite a day. The biggest day yet. I have 139 more rows to do...the earlier ones are easier...the later ones more difficult. I have finished almost 6 feet of material [for context...what you see on the loom there in the photo is about five inches of yardage - the entire piece should be about 13 feet]. I am about 47% done.

The small red and yellow nautical flag is the man overboard flag. I have never understood this flag. Who has enough time when there is someone overboard to hoist a flag? In all the drills I have participated in, everyone had a job to do when someone falls overboard...no one was told to hoist a flag.

I neglected to take a picture of the chart symbol for kelp. It's pretty subtle as is the reddish kelp beds that I am weaving. I have woven with a red and pink metallic thread with all the reddish threads underneath the navy and turquoise blues. By keeping it underneath I am hoping for a reddish sheen like the the kelp beds you see off the coast. I saw some great examples yesterday off of Malibu.

There is a great deal of subtlety in this piece. I am hoping with the right light it will all come through.

Wednesday, November 28, 2007

Danger

I am about a quarter done having made it up to the Danger sign. I tried to weave the red diamond with a shuttle while picking up the right threads but it just didn't show up enough. I ended up just weaving a white square and adding the red diamond with needle and thread. Looks good now. Tension issues continue here and there but I press forward.

Saturday, November 24, 2007

Thanksgiving Visitors

What does one do when a six grade teacher
visits for Thanksgiving?


Make Egyptian canopic jars and royal mummified animals out of plastic bottles and masking tape...of course.


Sunday, November 18, 2007

Warning - Fish Haven

Weaving continues on the maze...

I just finished that white section near the top of the photo. It is a warning sign for a Fish Haven. If you see that on your nautical chart - don't go there!

I have been experimenting with different metallic and shimmering threads. I have holoshimmer, sliver and metallic threads from Sulky - all in a variety of colors. I also bought some shimmering thread by Nomis at Nettie's during their recent liquidation sale. [Nettie's is an embroidery store in Beverly Hills which is going out of business this month. Most everything is 70% off. If you are near by, its worth a drop by - great tapestry wool yarn, knitting yarns and tons of other stuff.]

The holoshimmer thread is quite visible due to its intense mirror like qualities. Others are more subtle and only reflect a bit when the light is in the right spot. So far I have only been using the light emerald green colors and the white. I still get to experiment with the many blue metallics that I have. I also have some lavenders which might be a nice touch here and there.

This is one of the ways I keep interested while weaving so many yards of material in such fine threads.

Friday, November 16, 2007

It's Starting to be a Maze

Well, after one day of weaving I am now over 20% done. Things are moving nicely along. And yes, it finally looks like a maze. From now on, the photos should look fairly similar to this one...just with slightly different nautical signs here and there.

The path of water through the maze is in slowly changing shades of emerald green and turquoise. The dark blue stays dark blue except for the underlying changes in metallic and foam which floats underneath the two colors on top. These underlying colors peek out here and there giving the piece depth and subtle color changes. The warp also changes colors across adding another dimension to the piece. I look forward to seeing how it all works out.

The material is eighteen inches wide and with the fringe it measures out to nineteen inches. I need to make seven passes back and forth for a row to match a column in size. I am now on row 203 and have a total of 259 ignoring the hem on the top.

I have yet to project a finishing time...the time I sail by the Starting Line. Maybe I'll do the calculations tomorrow just to make sure I can finish in time. Once finished I will need to weave a sampler that goes in with the entry form. It needs to be perfect. Fortunately it is only eight inches by eight inches. I should have enough warp already on the loom to pull it off...fingers crossed.

ps here's my tapestry Harvest Moon which I just finished...

Wednesday, November 14, 2007

Ready for the Maze

It took awhile but I am finally at the point that I get to start weaving the maze. I am a bit over 10% complete...

The sail is done. The shimmery white I selected looks good. I am a bit disappointed by the blue flag - I did it in a shiny metallic blue. I thought it would pop more from the piece. It does shimmer...you just need the right light. I may embellish it later depending upon how the entire piece looks.

Each of the flags or symbols I incorporate into the piece will represent something from our nautical navigation days. Here the blue flag represents the Finish Line flag that the race officials would normally fly at the end of a race. The next symbol will be 'shallow water' markings you would see on a nautical chart.

I am looking foward to starting the maze. With the wind at my back, I should sail quickly through the piece.

Saturday, November 10, 2007

I have finished the FINISH

Despite what the word spells out this is only the beginning of my latest project. The is the beginning...or the end so to speak of the maze I am weaving for the yardage exhibit of Convergence 2009.

What you see here is a minimal part of a 259 block-row piece. Each block has 7 back and forth of the shuttle...I did the calculation as to what percentage is finished and it is way too small to admit.

The maze here is going to have a regatta theme. Near the top of the photo you can see the beginning of a sail...there will be more. I am trying to remember that the focus of the piece is not the bottom...but the maze itself. I keep wanting to enhance and embellish this bottom part.

I have tried many things to remove those nasty worms that form due to the inconsistent tension in the warp threads. The turquoise warp seems to have the worst problems while the lite blue has the least. They are both 100% polyester but obviously there is some difference. I won't go through all the things I have adjusted, tinkered with, pulled, tied, lashed etc.

I am now trying what I call the 'squirrel' approach...using nuts to weigh down the various threads. You can see I have attached key rings to bunches of warp and used a nut to weigh them down. I didn't have enough key rings for each of the 25 blocks so I have combined those that are similar in looseness. By using the same size nut, all the thread should have a similar tension. Time will tell.

Although I still seem to be having a bit of a tension issue with the warps on shaft 7. I am nevertheless plowing ahead. I will attempt a special massage once off the loom with a needle and a bit of spritz. Hopefully, that will remove the tension worms at the bottom of the piece...or I will embellish them to made them part of the piece....Time will tell.

Monday, October 29, 2007

Another Beginning

A beginning is the time

for taking the most delicate care

that the balances are correct.

- from "Manual of Muad'Dib" by the Princess Irulan


I began weaving my Regatta piece for the Convergence yardage exhibit today. I need to have it done by the end of the year so I can get slides made and sent off in mid-January. It's designed to be a 12 feet long maze woven with sewing thread so it is time I get started.

I had played around with colors, fixing my tension and tweaking my design for a week or so and today was the day to start. While working the hem, I determined I will need nine passes to make the rows and columns in the maze design to be approximately equal. Fortunately this is not a 3-D piece so approximately is all I will need.

There will be 2-3 inches of solid color at the bottom of the piece before the design appears. I have about one inch woven. Everything below the light blue stripes is the hem. As you can see in the photo, I got a weird wavy pattern in the weaving.

It only appears on one side of the piece. The other half of the yardage is straight, uniformly blue and clean. I must admit I played a bit in my photo editor so the photo would really highlight the worm like structure. It's not quite as bad as it looks in the photo. I figure it must have something to do with the tension since once I tightened up the pattern warps, it largely disappeared.

It always seems so difficult at the beginning of these pieces to get everything in balance... to get the warp tension right, the shuttles working properly, the right shades of color selected...but once six to eight inches are done...the piece really flies.

I should be flying later this week...

Wednesday, October 03, 2007

Let's Fly a Kite

Molokai has the greatest winds...perfect kite flying weather. This was a great opportunity to see if my Crackl'in Kite would fly.

I had designed it earlier for an exhibit at the Association of Southern California Handweavers conference in Visalia . I wrote about it earlier on my blog.

I folded up the box kite in a box so I could take it on the plane as a carry on. Once in Molokai I put it all back together and bought some kite string at the Big Wind Kite Shop in Maunaloa. It's a cool store with lots of kites and stuff from Thailand and similar spots. [It is actually one of the handful of stores on this island. One does not go to Molokai to shop. You will have much better luck at the Honolulu Airport!]

We forgot to bring the instructions as to how and where to tie on the string to the box kite. We tried a number of ways. It was fun[ny] trying to get the kite to fly. It was a bit lopsided and we had broken one of the side pieces of wood. We repaired it a bit with a bamboo skewer and yes it did fly.

The kite had a life of its own and would not fly like we wanted it to fly. Sometimes it flew in circles and sometimes it just hovered above the ground. But once it did get a nice lift and head into the sky. Here is the picture on the way up.

After some time, thought and lots of laughter we decided to put it away and try again the next day. We wanted to move the string from one side to the side where the fringe was to see if having the heaviest part of the kite nearer the ground would be a better way to get loft.

But...the next day...guess what...the winds died. It was the first time we have ever been in Molokai when there were no winds. Boy it was hot.

Monday, October 01, 2007

Knitting in Molokai

Just got back from a week in Molokai...one of the most laid back of the Hawaiian Islands.

No glitz, no shopping, no big tours...its as far from the Southern California experience as you can get within six hours. We used to like Maui but it has changed over the years into something resembling Southern California. We don't normally go on vacation to be somewhere like home.

But Molokai is definitely no Maui. We just love the place...have been there at least three times and are ready to plan another trip there. The first photo is a beach...at least two miles long...we were the only two people on the entire beach. My DH did his ten mile 'long day' for his marathon training in this area of the island. I got to read and do 'my' stuff.

I discovered that the 5+ hour plane ride was a great time to knit. I had thrown into my bag a zip lock bag with a few skeins of yarn and a WIP - made great progress - got through an entire ball of yarn...mostly on the plane but a few rows by the ocean. It was a nice pattern to knit - stripes of knit and garter- September 22nd from the Knitting Pattern Calendar. Great practice for perling [or is it pearling?] since it only has two knitted rows and 8 rows of perl in each pattern unit. KPKPPPPPPP

It is quite embarrassing to admit this is a WIP which started in November of last year. It is almost done...at which point I can finish up that other WIP which started even earlier than my Molokai scarf. I guess I just am a weaving diva and not a knitting knut

This second picture is by our 'camp' on the beach. It's lovely camping experience...a wooden tentalo with solar fans and lights. A private outdoor bathroom and shower. A chef to cook you breakfast and dinner. Wooden lawn chairs that you can sit on and star at the stars at night. Couldn't imagine a better place...except perhaps Anegada in BVI...but Molokai is so much closer.